

If cultivated meat doesn’t get the texture right, most people won’t buy it. In this piece, I’d sum it up like this: 3D bioprinting helps shape grain, marbling, bite, and juiciness by placing muscle, fat, and edible support material in set patterns, then letting the printed tissue mature over weeks.
Here’s the short version:
- I see texture as more than softness. It includes bite, pull, moisture, and fibre direction.
- I’d separate easy products from hard products: burgers and nuggets are simpler; steak-style cuts are much harder.
- 3D bioprinting works in 3 main steps:
- build a printable bio-ink
- map fibres and fat in a digital file
- print the cut, then mature it in an incubator
- The main challenge is thickness. Larger cuts still need nutrient channels through the tissue.
- As of 26 August 2026, cultivated meat is not on general sale in the UK.
What matters most to me is simple: can it look like meat, cook like meat, and feel right when you bite into it?
A quick way to think about it is this: mince-style products need less structure, while whole cuts need far more control over fibres, fat placement, and post-print growth.
| Product type | Texture demand | Print difficulty | What needs to be controlled |
|---|---|---|---|
| Burgers, mince, nuggets | Lower | Lower | General moisture and soft bite |
| Steak, fillet, chicken breast-style cuts | Higher | Higher | Fibre direction, marbling, tissue thickness, cooking behaviour |
From my point of view, 3D bioprinting is less about making meat look clever and more about making it feel familiar on the plate.
How 3D Bioprinting Creates Cultivated Meat: 3 Key Steps
Inside the Process of Lab-Grown Beef
sbb-itb-c323ed3
Step 1: Building the right ingredients for texture
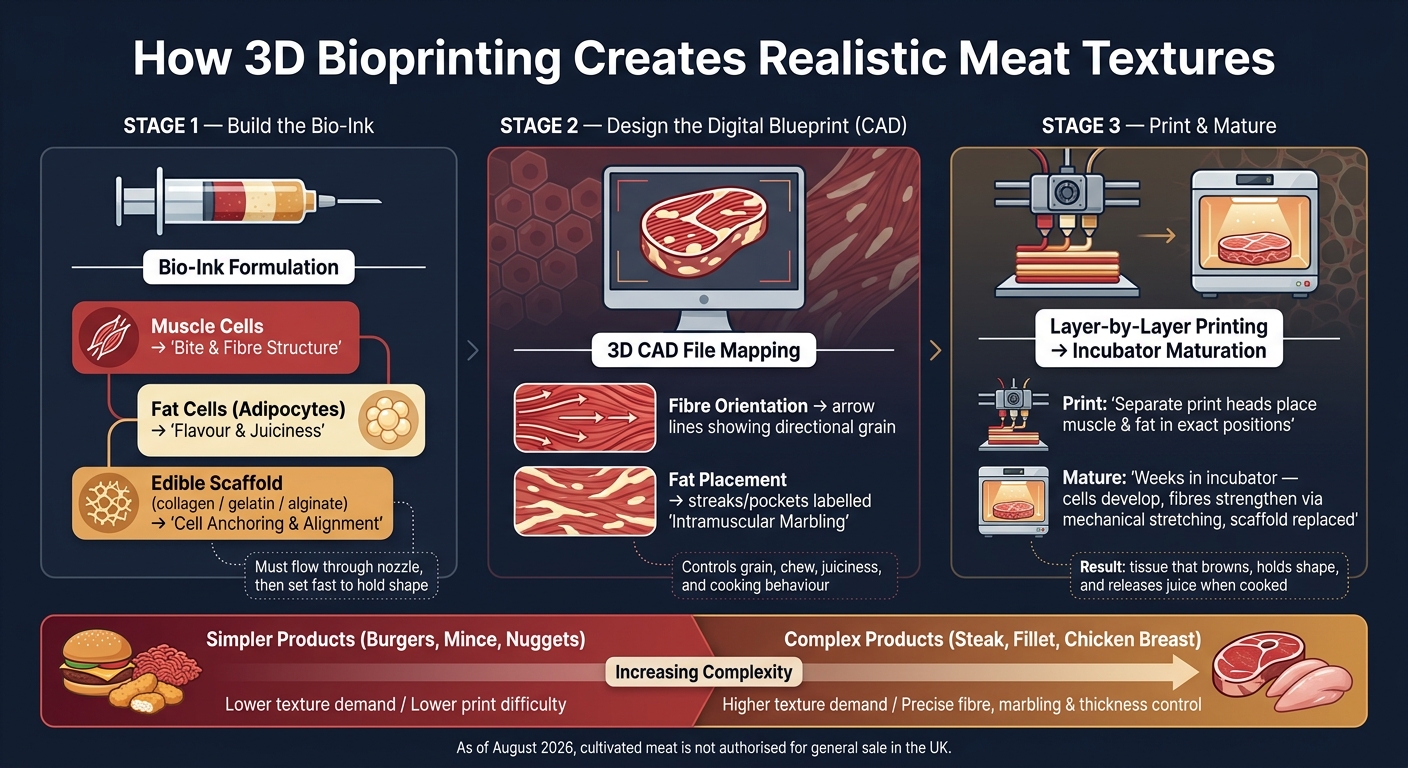
Once the texture goals are set, the printer needs a material blend that can actually produce them. That blend comes from three parts: muscle cells, fat cells and edible scaffolds. The goal isn’t just to print cells. It’s to print texture that feels like meat.
Muscle, fat and edible support materials
Skeletal muscle cells provide bite and fibre structure. Fat cells, known as adipocytes, add flavour and juiciness. Some formulations also use plant oils such as coconut or sunflower oil, especially in hybrid products. Put together, these ingredients form a bio-ink that can be printed layer by layer.
Edible scaffolds, such as collagen, gelatin or alginate, help keep fibres aligned while the structure sets. In simple terms, they give the cells somewhere to anchor and organise into structured tissue.
Why printable mixtures must flow first and firm up later
All three components are combined into a bio-ink - a viscous, paste-like mixture fed into the printer. It needs to do two jobs at once: flow through the nozzle, then set fast enough to hold its shape.
If it’s too runny, the layers slump and the structure loses definition. If it’s too stiff, it can block the nozzle or crack during extrusion. That balance is a bit like piping icing: too soft and it spreads everywhere, too thick and nothing comes out cleanly.
"You can control the shape, structure, flavor profile and nutritional value of a food by carefully integrating different ingredients into the 3D printing process." [1]
If the bio-ink holds its shape, the next step is arranging fibres and fat in the right pattern.
Step 2: Designing fibres and marbling before printing
Once the bio-ink is ready, the printer works from a digital blueprint. That blueprint is a 3D CAD file that tells the machine exactly where to place each material: where the muscle should go, where the fat should sit, and where extra support is needed.
How digital layouts control grain, layers and marbling
Muscle fibre direction matters more than it might seem. It helps create the grain and chew you expect from a real cut. So instead of printing one even, paste-like mass, CAD models map fibre orientation on purpose. That way, the printed piece can copy the texture of an actual cut.
After that, Fat placement does a lot of the heavy lifting for juiciness and bite. Rather than mixing fat evenly through the whole blend, digital layouts place it in specific streaks and pockets. That mirrors the intramuscular fat, or marbling, that gives cuts like ribeye or Wagyu their character. Researchers have shown this by printing muscle, fat and blood vessels in mapped positions to mimic marbling [1].
More advanced digital models can also handle multiple texture variables at once. That includes fibre density and the placement of fat that melts during cooking [3].
Comparison table: simple printed products vs structured whole cuts
The difference between a printed mince product and a printed steak isn't just the ingredient mix. A big part of it comes down to how much planning goes into the digital file before printing starts.
| Feature | Simple Printed Products (e.g., Mince, Burgers) | Structured Whole Cuts (e.g., Steak, Fillet) |
|---|---|---|
| Fibre Definition | Random or absent; uniform paste-like texture | Aligned directional fibres mapped via CAD to mimic natural grain |
| Marbling | Fat blended evenly throughout the bio-ink | Discrete fat streaks programmed in specific sequences |
| Bite and mouthfeel | Soft and consistent throughout | Complex; resistance varies between muscle and fat zones |
| Juiciness | Evenly distributed moisture | Localised fat deposits that melt during cooking |
| Production Difficulty | Low; basic layering of a single bio-ink | High; requires multi-nozzle coordination and precise CAD mapping |
Once the layout is locked in, printing can build the structure layer by layer.
Step 3: Printing and maturing the meat structure
How layer-by-layer printing creates bite and fat distribution
Once the blueprint is ready, separate print heads lay down muscle and fat in thin, exact layers, keeping marbling in the right spots [1][3]. Each head places material exactly where the CAD file tells it to, so fat forms clear streaks instead of mixing evenly through the whole cut [1][3].
Researchers have already printed steak-like structures with mapped intramuscular fat [1]. That detail matters. It helps the cut cook more like meat and less like paste [1][3].
Once printing is done, though, the structure still needs time to mature.
How maturation improves firmness, juiciness and cooking behaviour
Printing gives the tissue its form. Maturation is what makes that form usable. The printed structure sits in an incubator for weeks [1][3]. During that time, cells develop into muscle and fat [1][3]. Mechanical stretching and compression help the fibres get stronger [2]. As the tissue bonds, the scaffold is slowly replaced [2].
The end result is a structure that can keep its shape during handling, brown when heated, and release juice as the carefully placed fat layers melt [1][2][3].
Where 3D bioprinting works well, and where it still falls short
The progress here is real, but there are still some hard limits.
| Feature | Strengths | Current Limitations |
|---|---|---|
| Marbling | Precise fat placement replicates intramuscular marbling [1][3] | Exact natural complexity is still difficult to match [1] |
| Repeatability | Digital files produce identical portions every time [3] | Low throughput limits mass-market production [1] |
| Fibre placement | Directional fibres and density controlled during maturation [1] | Thick cuts still need vascularisation for deep nutrient delivery [2][3] |
| Cut size | Consistent, portion-sized shapes achievable [1] | Printer volume limits very large cuts [3] |
| Post-print stability | Layers fuse into stable tissue that holds during cooking [1][2] | Incomplete maturation can damage the structure during handling [3] |
What this means for shoppers in the UK
Why better texture could shape price and appeal
Texture is likely to affect both price and first-time appeal in the UK. The reason is simple: the more complex the texture, the more it costs to make.
Whole cuts such as ribeye are a good example. They need precise bioprinting and post-printing maturation to copy intramuscular fat, directional fibres, and the right bite. That makes them more of a premium product than an everyday purchase [2].
As of August 2026, no Cultivated Meat products are authorised for sale to the general public in the UK [2].
Conclusion: How 3D bioprinting helps Cultivated Meat feel familiar
The main issue is familiarity. Most shoppers won't judge this as a technical feat. They'll judge it on something far more ordinary: does it look like meat, cook like meat, and bite like meat?
That's where 3D bioprinting matters. By layering muscle, fat and support materials, then maturing the tissue, it helps Cultivated Meat feel familiar rather than merely similar. In the UK, that sense of familiarity is likely to play a big part in long-term adoption.
FAQs
Why is texture so important for Cultivated Meat?
Texture can make or break the eating experience. Conventional meat has a complex structure made up of muscle fibres, connective tissue and fat. So if you want people to enjoy Cultivated Meat, you need to match that chew, bite and mouthfeel.
When Cultivated Meat reflects those structural qualities, it feels more like the meat people already know. That matters. It can help people feel at ease with it and more willing to give it a place on their plate. At Cultivated Meat Shop, we see this as one of the main challenges in making it a practical and appealing choice.
Can 3D bioprinting really copy steak texture?
Yes. 3D bioprinting can mimic steak texture by layering muscle and fat cells in a way that recreates the fibrous, marbled structure you’d expect from beef.
Edible scaffolds, often made from plant proteins or hydrogels, help direct that growth. Getting to the full thickness of a standard steak is still hard, but the tech can already make realistic cuts with a similar mouthfeel, chew and look.
Why are thick cuts harder to make?
Thick cuts of Cultivated Meat are much harder to produce than thinner products. The main problem is simple: oxygen and nutrients struggle to reach deep into the tissue.
Here’s the gap. Oxygen usually travels only about 200 micrometres, while a standard steak is roughly 3.8 centimetres thick. That’s a massive difference, and it helps explain why whole cuts are so tough to make.
Without advanced vascular-like perfusion systems, cells in the middle of the tissue may not survive or mature as intended. As a result, it becomes harder to recreate the dense, whole-muscle structure people expect from a steak.


